Sunday 24 March 2013

One Photo, Four Pages.

I found this photo of Victoria and her cousin doing this thing where they slap their cheeks and whisper,  "Sparkles!"  I have no idea what it's from but it's hilarious and I knew there were many in my family who would like a copy of this photo.  I had four printed up and I decided to set myself the challenge of making four different scrapbook pages with them.  Here's what happened:


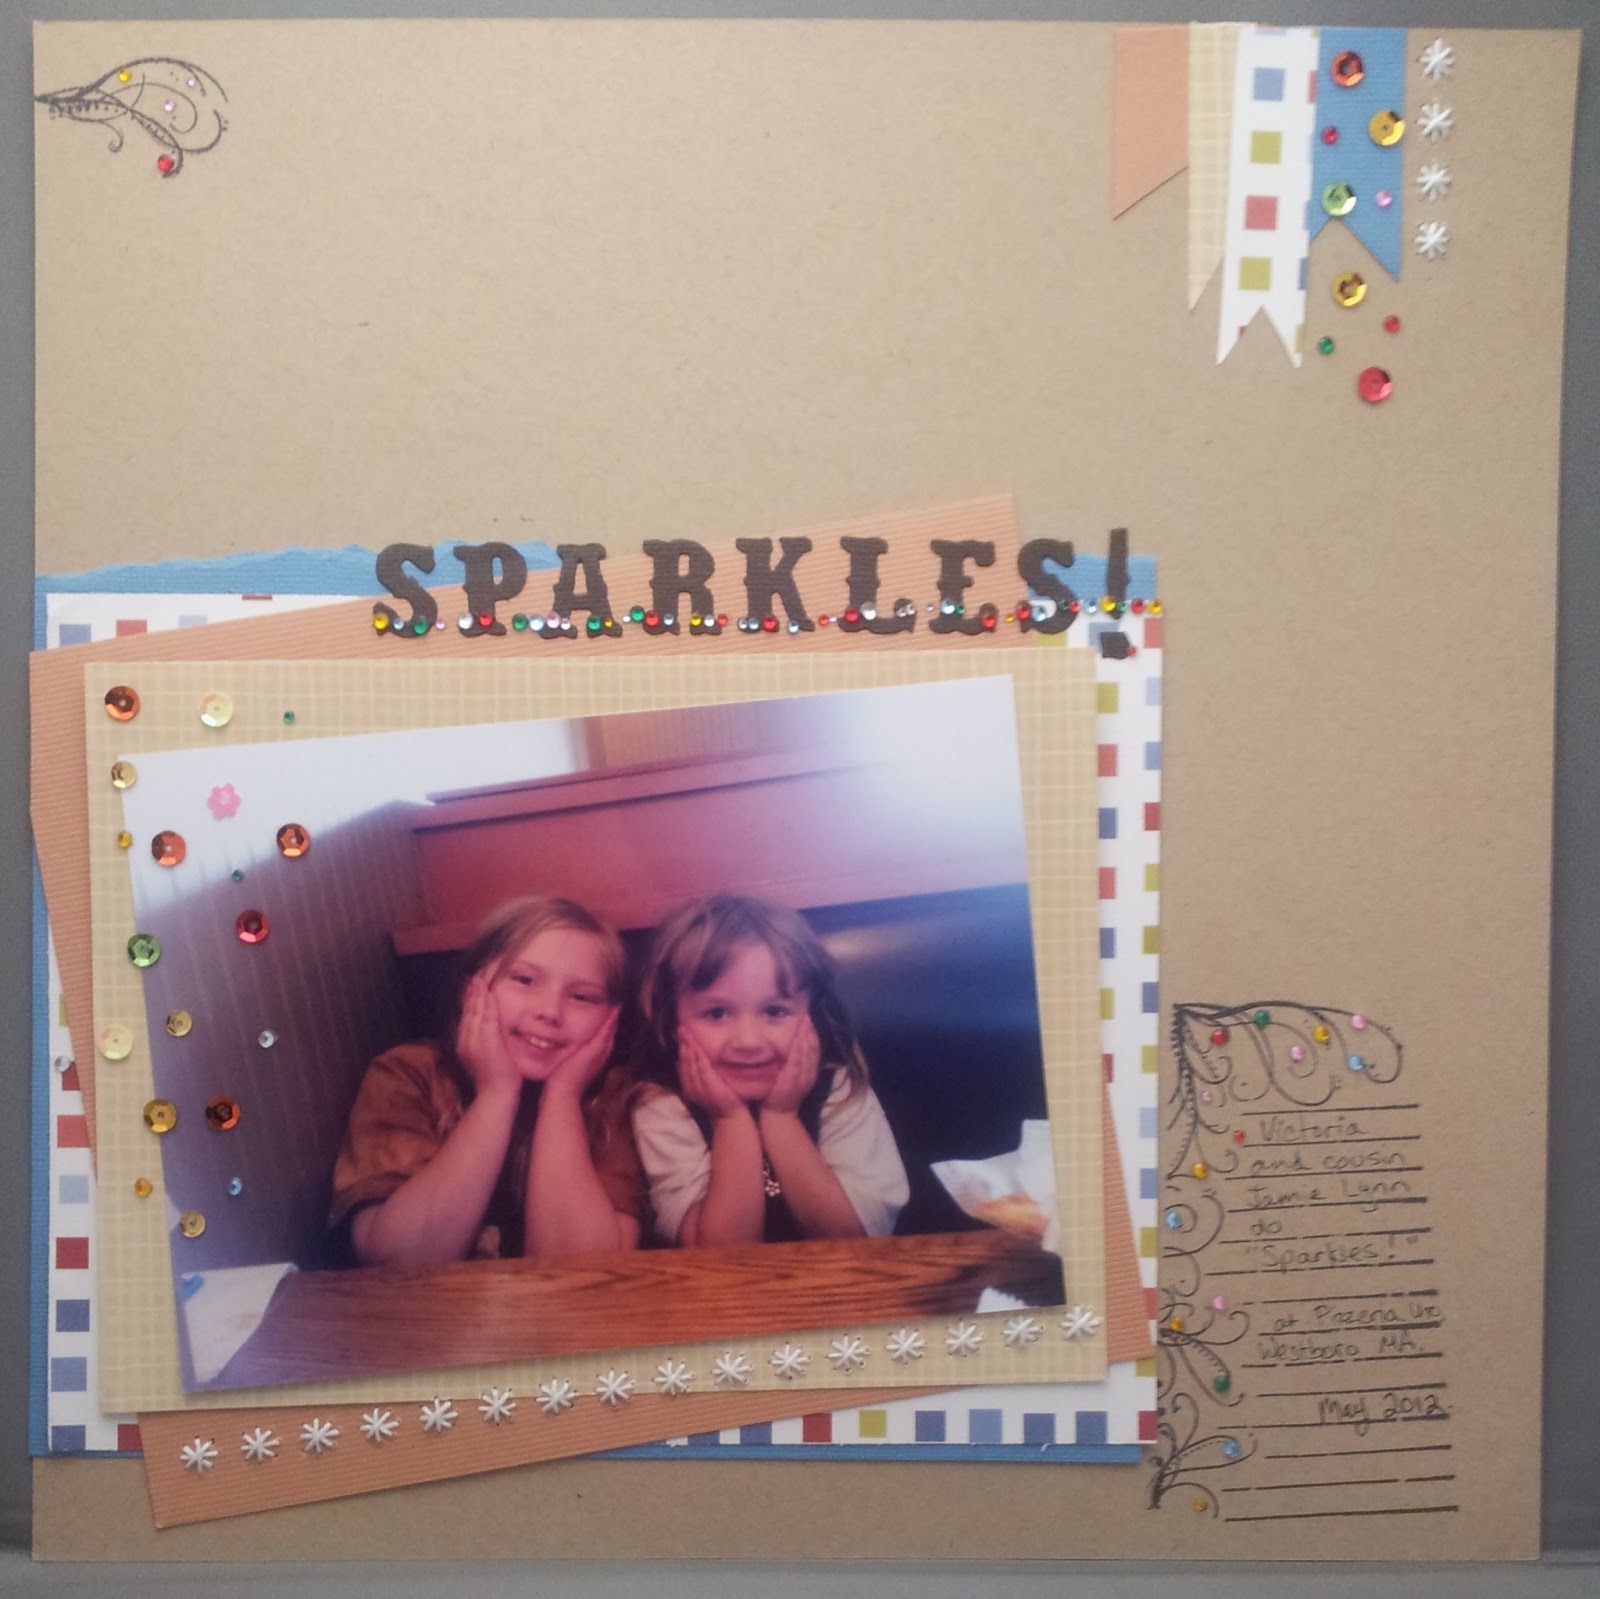
The above layout was my first effort.  I decided to use a technique from Shimelle's Pretty Paper Party, the stacked paper mats idea.  I alternated patterned paper with solid cardstock, making sure I saved little offcuts for the cluster of ribbons in the top corner.  I decided also to break out my Sew Easy tool from We R Memory Keepers and put a row or two of stitched asterisks on the page, and of course, add the.... Sparkles!  I stamped a journaling block and co-ordinating flourish by Bo Bunny and added Sparkles! to those too.  I die-cut a title from Tim Holtz Vintage Market Sizzlits.  This one's for me.   I love it too much to let it go!


Similar layout and same background paper, but that's where the similarity ends.  The stitching is scallops and zig-zags, with a stitched title to boot.  It didn't show up so well, so I outlined it with black pen.  More Bo Bunny stamping in the corners and I used strips of stick-on gems for the actual Sparkles!  This one is the most boy-friendly one I made, so it's going to my brother.


I put away the Sew Easy because after all the stitching I had done in the other two, I thought it was time for a change.  I also thought it was time to change the positioning of the photo and used another Shimelle idea (strip of cardstock stripes) to make it more interesting.  I stamped with another Bo Bunny set to add interest to some of the cardstock, doodled the title and vertical line of scallops, added the info and an entire margin full of Sparkles!  This one's going to the girl on the left.  I hope she likes it!!


And finally one for Mom!  She loves this dark peacock blue colour, so I thought I'd use it as the background along with a not-quite-whole piece of Basic Grey patterned paper that tones with it. I used a few off-cuts from  the previous page to create clusters of rectangles above and below the photo.  I followed the curves  of the hand-torn paper to place the die-cut title and the Sparkles!

Now, my only obstacle is to actually get around to sending them out.  Oh dear.... people who know me will know just how *wonderful* I am at posting things.  :)

Friday 22 March 2013

Mom and Michele

The weekend is upon us, and I thought I would share what I was up to last weekend at the Cardinal Colours weekend crop.

A month or two ago, I was messing around with paint, stencils and chipboard and made a scrapbook page that was ready to go bar a photo and title.  I stashed it in one of my crop boxes and I found it when I unpacked at the crop.  I had just done a print run of photos and one of them just looked great with the page, so on it went!


And here's one of those funky close-up thingies.


Tuesday 12 March 2013

Crochet Bow for Vixie


Here's my little Vixie using the computer.  What's that on her head though?

It's a crochet bow!  The pattern was in Simply Crochet issue 2,  designed by Cara Medus.  It called for 4-ply yarn doubled, but I just used some DK I had lying around.  It is pink but variegated with bits of magenta into pink into grey.  It's a very interesting one that LK picked up for me one day.  Thanks!!

Vixie has already worn it twice, and that's saying something.

Monday 11 March 2013

Inspired by my House


I live in a 1930's house that has the stained glass windows in the front hall.  I decided to take these motifs as inspiration for my next mirror.

I wanted a little bit of the text effect, so I wrote some random French and  English things about flowers and roses and friends etc and painted over it.

And here it is in situ:


I'm happy with that, although that's all I did this weekend.  :)

Saturday 9 March 2013

Broomstick Lace Square


Broomstick Lace is the crochet technique shown here.  There are four rows of four broomstick lace stitches in stripes of colour.

I learned Broomstick Lace from Naztazia on YouTube.  Check her tutorial out and you'll be making these in no time!

I did alter the technique slightly to accommodate my needs.  In Naztazia's instructions the stitch is a cluster of five loops held together by five stitches, but as my square was only to be 16 stitches in length, I clustered four loops and held them together with four stitches.  This enabled me to keep to the scale of the project.  When I was finished with the rows of loops, I continued around the border with chains to help with future assembly.

Squares of this colour combination are going into a special project that I'm doing with my mom.  She lives in the USA and I live in the UK.  We are crocheting different squares with the same yarn.  When  we make a square of a certain type, we make two of them.  We keep one and send one out.  We will each have the same exact squares, half made by each of us, and we will each be able to keep it.

I've done more squares.  I'll post these too eventually.   You have been warned!


Friday 8 March 2013

My First Panpastel Card

I used three new items on this card:

1.  Panpastel for the background.  I bought a few pans from Ally Pally last year, but I never really got into them until I bought the Mixed Media 2 set from Oyster Stamps.

2.  Also from Oyster, the Funny Bones sentiment stamp that I thought would work so well with-

3.  My wool and knit set of Marianne D Craftables dies from Crafts-u-Love.

I'll be making more of these for my yarn-obsessed friends and anyone who wants to give one!